In the era of HD images and videos, we crave more and more storage. Therefore, it becomes necessary to delegate these files from your desktop or mobile phone to some other storage device. Synology NAS is a Network Attached Storage (NAS) device that provides the user with a central location on the internet to save and manage data. Moreover, it enables the individual to build a private cloud so that he/she can access and share data freely and securely. But, all this will only become possible if the user can find Synology NAS on network. Just in case, you are also wondering how do I find my Synology NAS on the network, the information given on this page can help you out.
The process to find Synology on network can be executed in two ways. The first method demands you to use a web browser and access the Synology web assistant whereas when it comes to implementing the second method, you are supposed to download the Synology finder desktop app. Another name given to the desktop app is Synology Assistant.
The instructions given below will help you find NAS storage device using a web browser. Therefore, make sure that you have access to a high-speed internet connection before starting the process.
First of all, ensure that your NAS is turned on and is connected to your home network.
Load an internet browser on a desktop or laptop to access your home WiFi.
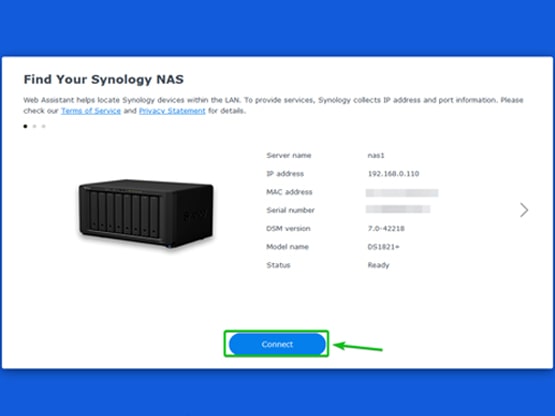
Enter find.synology.com into the address bar of the web browser and hit Enter.
You can also use synologynas:5000 instead of the Synology find my NAS URL given in the previous step.
Your Synology NAS storage device will show up on the screen.
If you see multiple storage devices, you are suggested to select the targeted one.
Lastly, click Connect to manage and monitor the online stored data.
This is how you can find Synology on network using a web browser. But, know that these steps only apply to Windows devices. Keep in mind to use the correct URL. Do not type find.synology.nas URL. Go with the correct one instead. You need to use the synologynas.local:5000 URL if you want to manage the online data via a Mac computer.

In case you do not want to use the Synology find my NAS URL, you can manage your NAS storage device and stored data using the desktop app, you can refer to the steps given below. However, you need to ensure that your desktop as well as the Synology NAS is connected to the same WiFi network.
Open the desktop utility brought in by Synology on your computer.
In case you have not installed this Synology finder desktop utility, download it.
Launch the app as soon as you install it on your PC.
Now, an automatic scan will happen.
Select your NAS storage device and start managing the data.
Now that you’ve become aware of the process of finding the storage device, we would like to put forward some glossary terms and their meanings related to Synology so that you can make the most out of it.
RAID is an acronym for Redundant Array of Independent Disks technology. As its expanded name suggests, it serves the purpose of combining multiple drives in a single storage space. Different types of RAID are available when it comes to Synology NAS. One can choose one according to performance, storage capacity, and reliability. The NAS storage device supports the following types of RAID.
SHR: You can combine 1-4 drives in this RAID type. When you choose to manage drives through this RAID type, volume size will be optimized. However, data redundancy is likely to occur if there are 2 or more drives in the volume. This RAID type can tolerate 0 to 2 drive failures.
Basic: This RAID type is composed of one drive and it acts as an independent unit. It does not provide data redundancy like the one we’ve discussed earlier. It can tolerate Zero failure.
RAID 0: The minimum number of drives required to use this RAID type is 2. It features a striping technique that allows the user to divide the data into blocks so that it can be transferred to several drives. Like the Basic one, it also does not provide data redundancy. And yes, no failure tolerance is there.
RAID 1: The number of required drives ranges from 2 to 4 and is capable of tolerating 1-4 drive failures. It writes data to identical drives at the same time. Hence, this RAID type provides data redundancy.
RAID F1: The number of drives that can be managed through this RAID type is 3 and it can tolerate only 1 failure. It also implements block-level striping like the RAID 0 type and writes more parity information on a certain drive. It is recommended for all-flash array management.
This is to inform you that all RAID types except the Basic one are available on certain Synology NAS models. It varies according to the number of drive slots and installed drives.
SHR or Synology Hybrid RAID is an automated system. It simplifies the storage management at a great level. In addition, it is best suitable for new users who are not acquainted with the types of RAID.
Synology Hybrid RAID is capable of combining two different-sized drives and creating a storage volume that has optimized capacity and outputs. Hence, less drive space is required. It allows for 1- or 2-disk redundancy. In other words, it can suffer one or two failed drives without causing any data loss.
Access your storage device through Synology Finder and open Store Manager.
Select Storage Pool and click Create.
Choose the Storage pool type and then configure its properties.
You have to mention the Storage Pool Description.
Enter the RAID type and RAID group.
Save changes to finalize the Storage Pool creation process.
Are you not able to install your hard drives in the storage device? Refer to the steps given below to learn how to do that:
Place your Synology NAS drive bay horizontally on a table and remove its front panel.
Can you see the drive bay? If yes, then slide out one and remove its side panels.
The next step is to slide the inner part of the exposed hard drive into the bottom of the tray.
The SATA port is supposed to face outwards.
After that, fasten the hard drive into the tray.
That’s all about finding the Synology NAS on the home network. In case you want to manage it remotely, make sure that you have port forwarded the device through your home WiFi router settings.
