How to Access Synology NAS Remotely?
It is possible to access the Synology NAS device externally. There are simple and easy methods that you can use to control Synology devices remotely other than find.synology interface.
DSM (DiskStation Manager) of Synology will help you to complete the ‘access NAS remotely’ task. The methods to access the DSM are by setting up QuickConnect, setting up DDNS (Dynamic Domain Name System) hostname, and the last one is setting up port forwarding rules.
So, let’s start to learn how to access Synology NAS remotely with the help of three methods starting with Synology QuickConnect.
Access Synology NAS Device Remotely
To start the remote accessing process, you have to access the Synology DSM (DiskStation Manager) and other services. So, let’s see three methods to get to DSM.
1. Setting Up QuickConnect
With the help of the QuickConnect feature of Synology, you can access DSM using a customized ID. Have a look at the steps to complete the mentioned task.
- Start the computer and go to the Control Panel, then select the External Access option.
- You will see the QuickConnect tab here, just click on it.
- Enable it by clicking the checkbox given on the screen.
- Type in the ID manually or assign a new one in the QuickConnect ID field.
- It will demand to agree to the Terms and Conditions and apply the changes.
After clicking on APPLY, the QuickConnect setup completes. Now, you can use your desktop to access the NAS remotely with the help of the QuickConnect Synology login ID.
2. Setting Up DDNS Hostname
By using Dynamic Domain Name System (DDNS), you can easily link to the Synology NAS by mapping the hostname to the IP address like 192.168.1.1. Take a look at the below steps that explain how to access Synology NAS remotely.
- First, go to the Control Panel of the computer and enter External Access.
- Here, just select DDNS and click the Add button. Now make some changes in the settings.
Changes:
A. Insert a hostname like xyz.synology.me.
B. Choose a service provider by selecting the Synology in the drop-down menu.
C. Then, enter the username and Email address for the DDNS provider.
D. Generate a strong password, and add the external IP address of the NAS.
- After making the changes, click on TEST CONNECTION button.
- Click OK to save the settings and DDNS setup is completed.
Now, you can easily access the Synology NAS device externally by using the DDNS (Dynamic Domain Name System).
Let’s go through the third method of accessing NAS remotely.
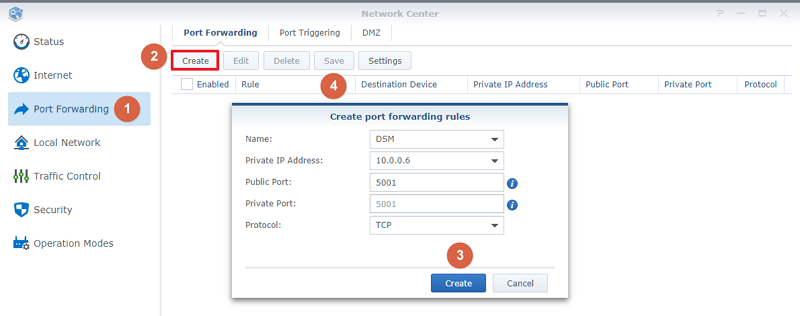
3. Setting Up Port Forwarding
Just follow the instructions given down here to set up the port forwarding rules and access the Synology NAS.
- Open the computer and select the Control Panel, then go to the External Access tab.
- You have to find and click on the Router Configuration, now select Create tab.
- Then, click on the Set Up Router to open the Setup Wizard, and click on the START button.
- Testing will start, and after it is done, the port forwarding setup wizard will launched.
- Choose one of the setup methods; Built-In application or Custom port.
After making the changes just click Done to save them. Now, the setup is completed and you can access the Synology NAS device remotely using the port forwarding rules easily.
Ending Up
From this blog post, you have learned how to access Synology NAS remotely by using different methods, which include Synology QuickConnect setup, Dynamic Domain Name System (DDNS) setup, and port forwarding rules. Hope, you have accessed the NAS device easily from the above written methods and steps.
