How to Set Up Synology Router Quickly?
Are you looking for instructions to set up your Synology router in a snap? If yes, then this post can prove helpful to you. Over here, we have shed light on the steps on how to set up Synology router quickly. Given that, keep reading!
Synology Router: Quick Installation
Here are the instructions to set up Synology router very quickly. Keep scrolling down!
Install the Synology Router Antennas
Step 1: First things first, you need to install the antennas of your Synology router. So, on your device, means on the Synology router, attach the antennas to the connectors firmly. After that, you need to turn each one (the antennas) clockwise until and unless it is finger-tight.
Are the antennas inserted into the connectors firmly? If yes, adjust/ pull the antennas to straight-vertical (upright) position.
Place Your Synology Router
After adjusting the antennas of your Synology router, the next thing that you need to do is to choose an open and center-most area in your home. If your Synology router is not catching WiFi signals in the central location of your home, relocate over a floor-level position or where it can easily catch the WiFi signals.
Important Points
- You must ensure to place your Synology router away from the devices/ objects that cause interference, like cordless phones, baby monitors, Bluetooth speakers, microwave Owens, etc.
- Also, you must not place the Synology router closer to brick walls, in corners, dry walls, or doors. Doing so will absorb the Synology router’s signals, resulting in creating issues while extending the range and coverage of the Synology device.
Plug In Your Synology Router
Power on your Synology router now! For this, you have to choose a working power socket for the router that should supply a stable yet fluctuation-free power supply to it. In order to prevent IP conflict afterward, it is suggested to plug in your Synology router in reach of your existing modem.
Refer to the table below to know the LED status on Synology router:
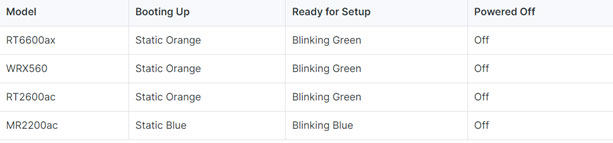
Your Synology router may make take longer time that usual to boot up. So, have patience! Do not or unplug the router!
Connect Your Synology Router to Internet Modem
Step 1: Put your hands on the Ethernet cable. Make sure that the cable you are using is in good-condition.
Step 2: Connect your existing modem to the Wan port of your Synology router with the help of an Ethernet cable.
Instructions to Connect Synology Router using a Computer
You can easily connect your Synology router to computer or laptop in a wireless manner or via Ethernet source. Here’s how to do that:
Using an Ethernet cable: Ensure to connect a working Ethernet cable to the LAN port of Synology router and other end into your computer.
Using a wireless source: Make sure to enable/ turn on the WiFi of your computer. Once it is turned on, navigate to the WiFi settings of your computer and find the default SSID of your Synology router.
The default SSID is labeled on the back panel of your Synology router.
Step 3: Once you are done connecting your Synology router and your computer, load up a web browser of your choice and enter router.synology.com or 192.168.1.1 IP in the address bar. Once you are done, press the Enter key.
Note: If you don’t own a computer, use a laptop instead and connect it to your Synology router using the same instructions we have provided above for connecting the computer and Synology router.
Connect Synology Router using Android (mobile) Device
- Turn on the WiFi on your mobile or Android device.
- Launch DS router.
- Tap Set up new router.
On the off chance, you are managing other Synology router (s) in the app, tap + icon. You can find the icon at the upper-right corner on the Synology login page.
Step 1: Navigate to Settings > Wi-Fi on your Android device. Doing so will help you connect your sinology router to default SSID (WiFi network name).
If you don’t prefer to go with the manual method for connecting the Android device to Synology router manually, then tap on Scan QR code and get connected with the router right away.
Refer to the back panel of your Synology router to scan the QR code.
Step 2: Once you are done, the Synology router will load up in a flash. As soon as the information of your Synology router loads up, follow the on-screen instructions and get it configured in a jiffy.
The Last Words
Our blog on how to set up Synology router quickly ends here. Anticipating that the instructions highlighted above will help you set up your Synology router without hindrance. Additionally, you can register for a free QuickConnect ID as well (recommended). Doing so will allow you to connect to and manage your Synology router over the internet and that too without the need of remembering the Synology Router’s IP address.