How Do I Connect My Synology NAS to a VPN Server?
A Synology NAS device can be easily turned into a VPN client. After that, you can connect it to an existing VPN server. It can be done by VPN services like PPTP, OpenVPN, or L2TP/IPSec protocols. Just in case, you have several VPN servers, you are free to create separate VPS profiles for each server so that you can switch to different VPN servers easily. This blog will make you aware of the steps to be followed in order to connect Synology NAS to a VPN server.
Instructions to Connect Synology NAS to VPN Server
The very first step involved in the connection process between a Synology NAS and a VPN server is the profile creation. Therefore, you are first required to access your NAS through the find.synology URL and create a VPN profile. After that, you can follow the steps given below:
VPN Profile Creation on Synology NAS
Select CONTROL PANEL > NETWORK > NETWORK INTERFACE > CREATE > CREATE VPN PROFILE. Choose PPTP (Point-to-Point Tunneling Protocol) or OpenVPN or L2TP (Layer 2 Tunneling Protocol).
How to Create a PPTP Profile?
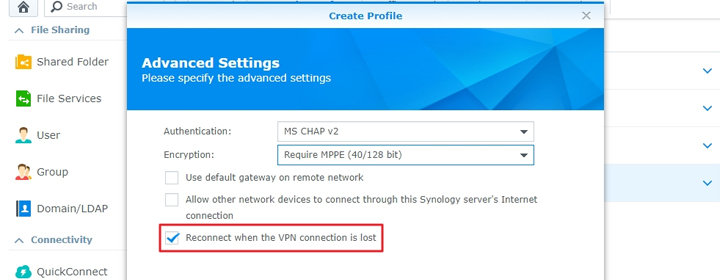
As soon as you are prompted to choose a VPN connection method on the NETWORK INTERFACE tab, you are suggested to select PPTP and select NEXT. Once done, follow these instructions:
- Now, you have to pick a name for the profile.
- Thereafter, enter the address of the VPN server with which you want to establish the NAS connection.
- Input the username and password for the server. FYI, it is provided by the server administrator.
- Click Next.
- Select one of these authentication protocols from the AUTHENTICATION menu – PAP, CHAP, MS CHAP, MS CHAP v2.
- In case, you pick any of the last two protocols, you need to encrypt the VPN connection by selecting No MPPE, Require MPPE (40/128 bit) or Maximum MPPE (128 bit).
- Select any one of the following checkboxes as per your needs:
- Use default gateway on remote network: It will router the NAS traffic to the VPN server.
- Allow other devices to connect the NAS server’s internet: The devices using the same network as NAS will be able to connect to NAS.
- Reconnect when VPN is lost: This will re-attempt the connection 5 times in the case of a connection loss.
- Select Apply.
How to Create an OpenVPN Profile?
This time when the Synology asks you to choose a VPN connection method, you need to select OpenVPN and select NEXT. After that,
- Select the name for the profile.
- Find the Import .ovpn file field and select BROWSE.
- Import the .ovpn file that you exported from the VPN server.
- Input the required information and import the CA certificate.
- If you have TLS-auth key, client key, etc, import them under the ADVANCED OPTIONS.
- Select NEXT and mark the checkbox as per your requirements.
- The options are Use default gateway on remote network, Allow other devices to connect the NAS server’s internet, or Reconnect when VPN is lost.
- Select APPLY.
How to Create an L2TP/IPSec Profile?
Choose the L2TP/IPSec option from the VPN Connection method on the Network Interface. After clicking Next, go through these instructions:
- Specify the name and address of the VPN profile server you have created.
- Input the pre-shared key for the VPN server.
- Pick the authentication protocol from PAC, CHAP, MS CHAP, or MS CHAP v2.
- Select the Use default gateway on remote network, Allow other devices to connect the NAS server’s internet, or Reconnect when VPN is lost checkbox depending upon your requirements.
- Select APPLY.
In this manner you can create different VPN profiles on a NAS and connect Synology NAS to a VPN server. If you want to connect or disconnect a VPN server, you need to choose a VPN profile and select CONNECT or DISCONNECT after that. If you want to modify it, simply select the EDIT button.
The Conclusion
This was all about how to connect Synology NAS to a VPN server. Here, you learned to create profiles for 3 different VPN servers. We are now expecting that the information given in this post will be helpful.