What is Data Scrubbing Synology? Why Should You Do It?
There can be errors in data stored in a Synology NAS storage device. These errors won’t allow you to manage the data easily. That is why it is important to do data scrubbing on Synology NAS. What is Data Scrubbing Synology and how often should you do it? We’ll help you find answers to such questions in this blog.
What is Synology Data Scrubbing?
Data scrubbing is the process of cleaning or repairing the data that is incomplete or incorrect. It also helps you to correct duplicate data or data that has become erroneous due to some other reasons. The process identifies data errors and then change, update, or remove them to make everything perfect and prevent drive failure. Now, read ahead and learn how to perform data scrubbing on a Synology NAS.
Key Points to Know Before Beginning
This feature only works with Btrfs volumes or storage pools with SHR, RAID 5, RAID 6, or RAID F1.
The scheduled data scrubbing might get halted if the NAD device shuts down during data writing. However, it will resume again once you turn on your Synology NAS.
How to Perform/Schedule Data Scrubbing on Synology NAS?
First of all, you have to enable the Data Checksum for Advanced Data Integrity for a shared folder via the following path.
- Go to find.synology.
- Select Control Panel > Shared Folder.
- Click Edit > Advanced.
- Check the box labeled Data Checksum for Advanced Data Integrity.
Once you are done enabling the feature, you are all set to schedule or perform Data Scrubbing immediately on your Synology NAS device. The steps are mentioned below:
To Run Data Scrubbing Synology Immediately
- Move to the Storage page.
- Select the storage pool.
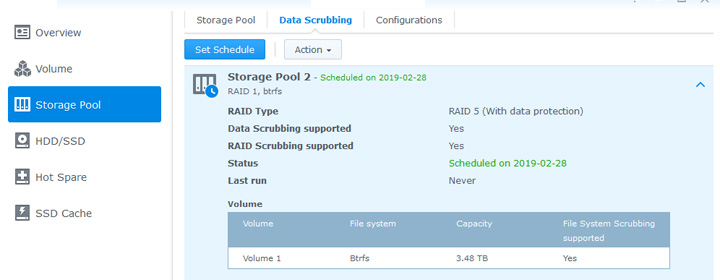
- Go to the Data Scrubbing section and select Run Now.
Quick Info: The Data Scrubbing section will not be available if the storage pool you’ve selected does not support the feature.
To Schedule Data Scrubbing on NAS Device
- Go to Storage > Schedule Data Scrubbing.
- Check the box labeled “Enable Data Scrubbing Schedule”.
- Now, select storage pools and prioritize them.
- Set the schedule as per the following parameters:
- Frequency: You can choose how often you wish to run data scrubbing. Let us say, every month or every 6 months.
- Set Time Grid: It helps you pick a specific time to perform Synology Data Scrubbing so that there will be no effect on the NAS performance.
- Next Run Time: It will let you know about the date and time for the next scheduled data scrubbing.
- Save the changes.
Notes: If the selected pools do not support data scrubbing, you will not see the Schedule Data Scrubbing option. Also, you can run data cleaning or scrubbing on one pool at a time. Once data scrubbing is in progress, the status will change to Running Data Scrubbing from Healthy. It will change back to Healthy.
What to Do If You Can’t Perform Data Scrubbing on a Storage Pool?
There can be times when you will be unable to perform or schedule Data scrubbing for a particular storage pool. The following steps will let you understand how to find the reason why you can’t perform data scrubbing:
- Move to the Storage page and select Schedule Data Scrubbing.
- You will see the list of storage pools on which no data scrubbing can be performed. You will also find the reasons listed along with them. They can be one of the following:
- Incompatible file systems, RAID configurations, and abnormal pools.
Note: Degraded storage pool will be removed from storage pools on a temporary basis and will be added once the repairing process gets completed. The crashed storage pool will not appear on the scheduled list.
How to Pause Data Scrubbing on NAS?
Data scrubbing is a time-consuming process and you might want to manually pause it. Here’s how:
- Go to Storage and select the storage pool on which data scrubbing is happening.
- Expand the menu to get complete information.
- Select Data Scrubbing > Pause Data Scrubbing.
- If Data Scrubbing is scheduled, you have to select Pause Schedule.
In this way, you can pause data scrubbing on Synology NAS. The steps given here are applicable no matter whether you have done Synology DS920+ setup or have installed another NAS.
The Final Thoughts
The last thing we want to say before wrapping up is that you can also modify the data scrubbing schedule by following the path Overview > Task Schedule and changing the frequency and time grid according to your requirements. Not only this, but you can also add or remove the storage pool by selecting Storage > Schedule Data Scrubbing > Check/Uncheck the box to add or remove a storage pool.
